


Table of contents

No headings in the article.
When designing an app that requires user registration and verification, it's important to have a clear understanding of the process and the different steps involved. One effective way to visualize this process is by creating a sequence diagram, which shows the interaction between the user and the system over time.
A sequence diagram can help you identify potential issues or bottlenecks in the signup and verification flow, and ensure that the process is user-friendly and efficient.
In this article, we will guide you through the process of creating a sequence diagram for a user signup and verification flow in an Android app, using an online tool found here https://sequencediagram.org/. We will cover the key steps involved in the process, and provide tips and best practices to help you create an informative sequence diagram. Whether you're a developer, a UX designer, or a product owner, this article will help you gain a better understanding of how to design a seamless signup and verification flow for your app.
So here's a step-by-step guide to creating a signup and verification flow sequence diagram.
Step 1: Defining the scope of our sequence diagram
Before creating a sequence diagram, it's important to define the scope of our diagram. What are the key interactions between the user and the system that you want to visualize? In our case, user signup and verification process is our scope. Defining the scope of your diagram will help you stay focused and avoid unnecessary complexity.
Step 2: Identifying the actors/participants and their roles
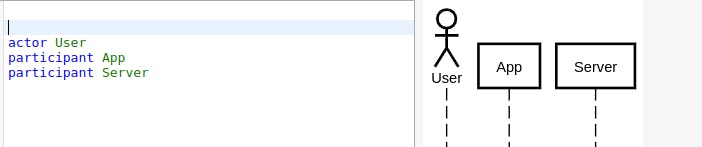
After defining the scope of the sequence diagram, identifying the actors involved in the process and their roles is our next step. So here, the user is the actor(user of the app/system) while the app and server are the participants(objects making up the system).
Here are their roles:
User: Entering signup credentials(email, name & phone) and a verification code sent from the server.
App: Validating signup credentials, Sending sign-up request from the user to the server.
Server: Sending verification code and verifying verification code.
To start drawing, let's head to https://sequencediagram.org/ and enter the pseudocode as follows to create the user, app and server:
Step 3: Mapping out the sequence of actions
We have identified the actors and their roles, it is now time we get our hands dirty by mapping every sequence of actions involved in this flow. Generally, it involves creating a timeline of the interactions between the actors, and representing these interactions using message arrows and lifelines.
Here message arrows are lines representing communication between two objects in a sequence diagram whereas, lifelines are vertical lines representing the lifetime of an object in a sequence diagram.
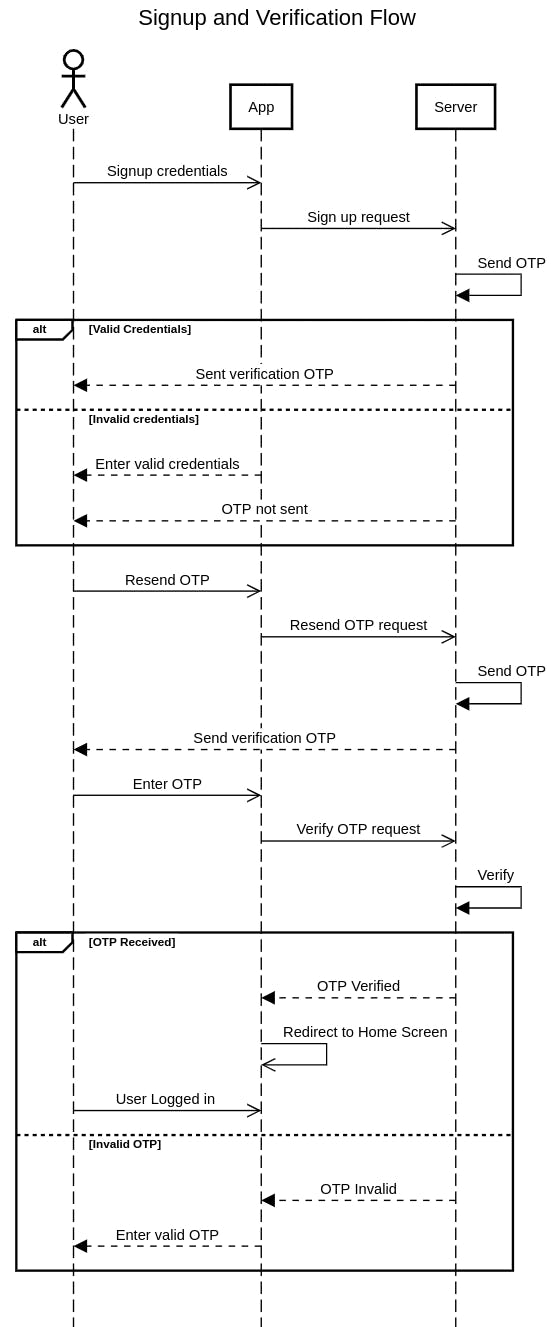
To show the interaction between the user, app and server when signing up, we key in this; User->>App:Signup credentials , App->>Server:Sign up request , Server<-Server:Send OTP This depicts the user entering the signup credential on the app which will then send the request to the server. The server will then send OTP to the user if the signup credentials are correct.

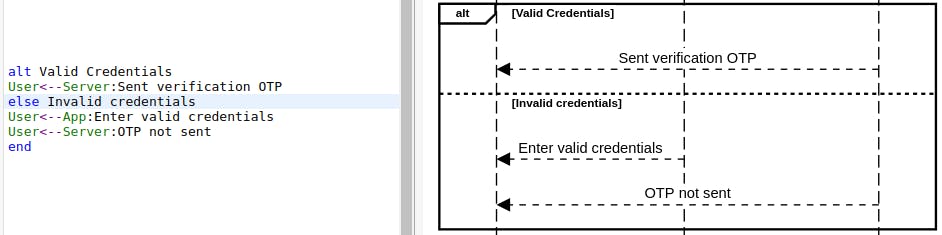
Now this brings us to two scenarios, signup being successful(valid signup credentials & server sending the OTP) and signup failure(invalid signup credential or server failing to send OTP). To represent these scenarios in our diagram, we use alt (alternative) keyword.
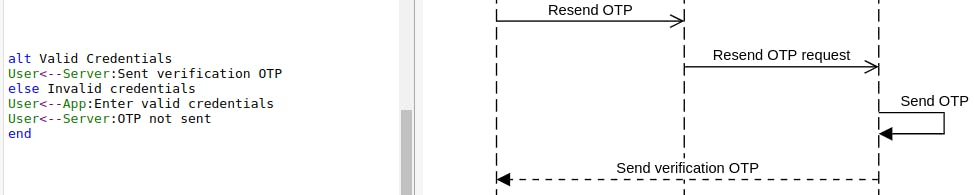
In the case where the user didn't receive the OTP from the server after the signup request. The user will have to request another OTP, it could be by clicking resend code button. To achieve this, we will follow the previous steps but the request will be different.
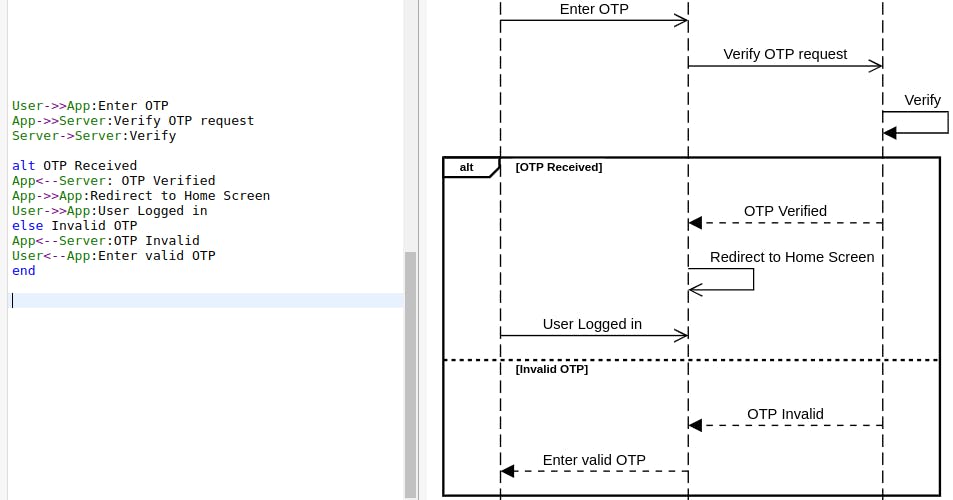
Once the OTP has been received, the user enters it on verify signup screen to send an OTP verification request to the server via the app. If successful the user will be redirected to the home/login screen accordingly. If not successful an error message is sent to the user.
Here is our final pseudocode:
title Signup and Verification Flow

actor User
participant App
participant Server

User->>App:Signup credentials
App->>Server:Sign up request
Server<-Server:Send OTP

alt Valid Credentials
User<--Server:Sent verification OTP
else Invalid credentials
User<--App:Enter valid credentials
User<--Server:OTP not sent
end

User->>App:Resend OTP
App->>Server:Resend OTP request
Server<-Server:Send OTP
User<--Server:Send verification OTP

User->>App:Enter OTP
App->>Server:Verify OTP request
Server->Server:Verify

alt OTP Received
App<--Server: OTP Verified
App->>App:Redirect to Home Screen
User->>App:User Logged in
else Invalid OTP
App<--Server:OTP Invalid
User<--App:Enter valid OTP
end
and our sequence diagram:
Wrap up:
In this article, we have gone through steps for creating a sequence diagram for a user signup and verification flow in an Android app. By following these steps, you can gain a better understanding of the interactions between the user and the system, and ensure that your various user flows are seamless and user-friendly.
Whether you're a developer, a UX designer, or a product owner, creating a sequence diagram can help you identify potential issues in the user flow, and ensure that your app delivers a great user experience.